## 制作动画效果
静态的文字太无趣了,我们给title做一个移动加显影的效果。
bevy 0.15 新增了动画系统, 我们将title改为Text2d, 然后移动它的坐标。
在制作动画之前先要添加一个新的相机,为什么呢?
因为之前我们添加了一张全屏的图片做为背景, 它的层级是最高的, 非UI的Component会被它遮挡掉。怎么处理呢?
### 增加动画相机
先将原来的Camera标记为默认UI相机。
然后再新建一个动画渲染层RenderLayers, 它的层级为1(默认为0)
然后在新建一个相机, 指定渲染层, 然后加入Camera组件,指定order为1, 这里的order是指相机的渲染顺序, 越大越晚渲染,所以动画渲染会在UI层之上
```rust
pub const ANIMATION_LAYERS: RenderLayers = RenderLayers::layer(1);
fn setup_camera(mut commands: Commands) {
commands.spawn((Camera2d, IsDefaultUiCamera));
let anime_camera = commands
.spawn((
Camera2d,
Camera {
order: 1,
..default()
},
ANIMATION_LAYERS,
))
.id();
commands.insert_resource(AnimeCamera(anime_camera));
}
```
### 动画代码
首先需要建立一个动画切片, 然后通过 `Name` 建立一个动画的target_id
``` rust
let title = Name::new("title");
// Creating the animation
let mut animation = AnimationClip::default();
// A curve can modify a single part of a transform: here, the translation.
let title_animation_target_id = AnimationTargetId::from_name(&title);
```
### 添加移动动画
需要建立一个动画曲线,这里使用了 UnevenSampleAutoCurve。这个曲线会在不均匀的时间间隔里做差值运算。其他曲线参考[官方文档](https://docs.rs/bevy/0.15.0-rc.3/bevy/math/curve/index.html)
下面的配置是在0.0秒到4.0秒之间,移动的采样参数
``` rust
animation.add_curve_to_target(
title_animation_target_id,
UnevenSampleAutoCurve::new([0.0, 0.5, 1.0, 2.0, 3.0].into_iter().zip([
Vec3::new(start_pos.0, start_pos.1, 0.0),
Vec3::new(start_pos.0, start_pos.1 + 50.0, 0.0),
Vec3::new(start_pos.0, start_pos.1 + 100.0, 0.0),
Vec3::new(start_pos.0, start_pos.1 + 150.0, 0.0),
]))
.map(TranslationCurve)
.expect("should be able to build translation curve because we pass in valid samples"),
);
```
### 字体颜色变化
先定一个动画属性,指定修改 `TextColor`
``` rust
#[derive(Reflect)]
struct TextColorProperty;
impl AnimatableProperty for TextColorProperty {
type Component = TextColor;
type Property = Srgba;
fn get_mut(component: &mut Self::Component) -> Option<&mut Self::Property> {
match component.0 {
Color::Srgba(ref mut color) => Some(color),
_ => None,
}
}
}
```
添加动画曲线, 这里用的是 `AnimatableKeyframeCurve`
``` rust
animation.add_curve_to_target(
title_animation_target_id,
AnimatableKeyframeCurve::new([0.0, 1.0, 2.0, 3.0].into_iter().zip([
Srgba::new(0.0, 0.0, 0.0, 0.1),
Srgba::new(0.0, 0.0, 0.0, 0.3),
Srgba::new(0.0, 0.0, 0.0, 0.6),
Srgba::new(0.0, 0.0, 0.0, 1.0),
]))
.map(AnimatableCurve::<TextColorProperty, _>::from_curve)
.expect("should be able to build translation curve because we pass in valid samples"),
);
```
创建动画图和播放器
``` rust
// Create the animation graph
let (graph, animation_index) = AnimationGraph::from_clip(animations.add(animation));
// Create the animation player
let mut player = AnimationPlayer::default();
player.play(animation_index);
```
### 组件挂载
将相关的组件挂载到Title实体上。 注意这里还加载了TargetCamera这个组件, 它的作用将Title渲染到动画相机上。
``` rust
let title_id = commands
.spawn((
Text2d::new("Jigsaw Puzzle"),
text_font.clone(),
TextLayout::new_with_justify(text_justification),
TextColor(BLACK.into()),
ANIMATION_LAYERS,
TargetCamera(**anime_camera),
Transform::from_xyz(start_pos.0, start_pos.1, 0.0),
// Transform::from_xyz(0.0, 0.0, 0.0),
title,
AnimationGraphHandle(graphs.add(graph)),
player,
OnMenuScreen,
))
.id();
commands.entity(title_id).insert(AnimationTarget {
id: title_animation_target_id,
player: title_id,
});
```
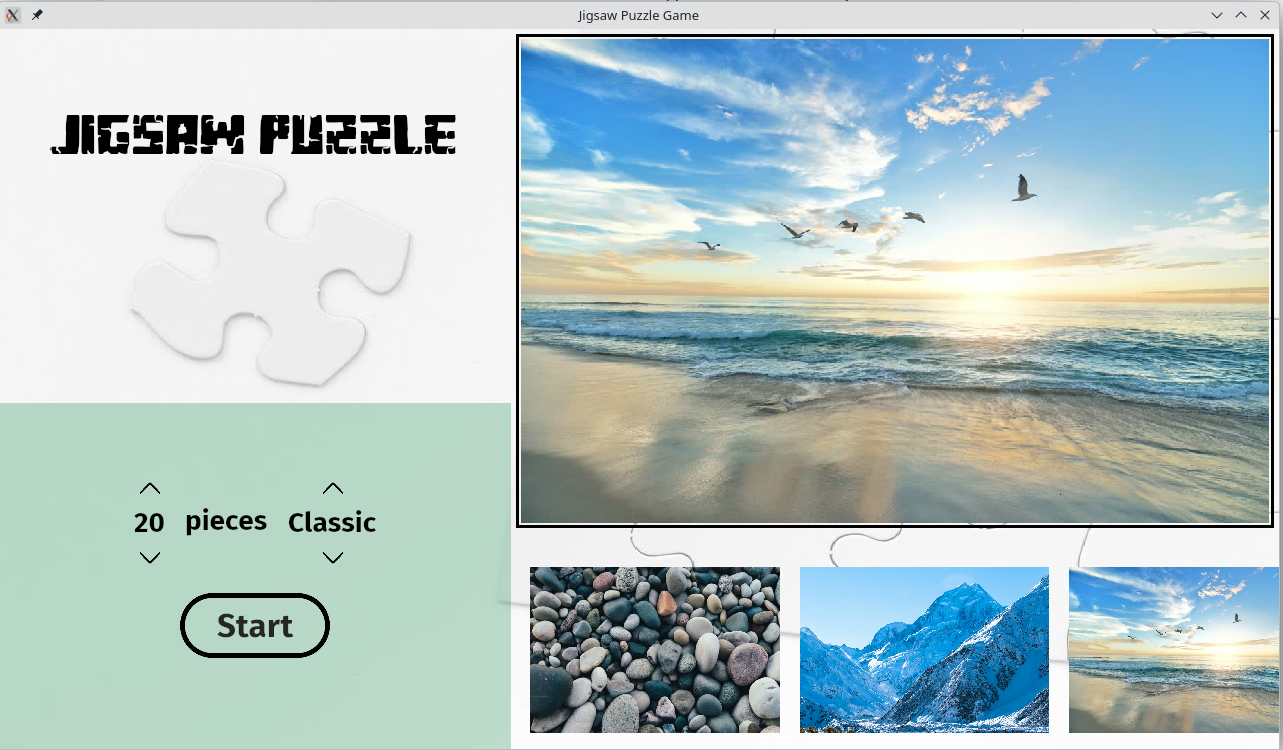
## 游戏模式切换
在游戏开始前选择拼图块数和拼图切块模式
给这些枚举包装一下,添加`Next`和`Previous`方法
```rust
#[derive(Debug, Resource, Deref, DerefMut, Default)]
pub struct SelectGameMode(pub GameMode);
impl fmt::Display for SelectGameMode {
fn fmt(&self, f: &mut Formatter<'_>) -> fmt::Result {
write!(
f,
"{}",
match self.0 {
GameMode::Classic => "Classic",
GameMode::Square => "Square",
}
)
}
}
impl SelectGameMode {
pub fn next(&mut self) {
*self = match self.0 {
GameMode::Classic => SelectGameMode(GameMode::Square),
GameMode::Square => SelectGameMode(GameMode::Classic),
};
}
pub fn previous(&mut self) {
*self = match self.0 {
GameMode::Classic => SelectGameMode(GameMode::Square),
GameMode::Square => SelectGameMode(GameMode::Classic),
};
}
}
```
切换游戏模式对应显示的文字
``` rust
// system
app.add_systems(Update, update_game_mode_text.run_if(resource_changed::<SelectGameMode>)),
fn update_game_mode_text(
select_mode: Res<SelectGameMode>,
mut mode_query: Query<&mut Text, With<GameModeText>>,
) {
for mut text in mode_query.iter_mut() {
text.0 = select_mode.to_string();
}
}
```
## 拖动选择图片
在上层容器Node需要设置`overflow`为clip, 这样超出容器的图片就会裁剪掉。
然后下层容器用绝对定位,然后绑定拖动事件。
``` rust
// 上层容器
p.spawn((
Node {
width: Val::Percent(100.0),
height: Val::Percent(30.0),
overflow: Overflow::clip(),
..default()
},
))
.with_children(|p| {
// 图片容器
p.spawn((
Node {
height: Val::Percent(80.0),
display: Display::Flex,
justify_content: JustifyContent::SpaceBetween,
position_type: PositionType::Absolute,
left: Val::Px(0.0),
margin: UiRect::all(Val::Px(30.)),
..default()
},
ImagesContainer,
Visibility::Hidden,
HiddenItem,
))
.observe(drag_start)
.observe(drag_end)
.observe(drag_images_collection);
});
```
处理拖动, 这里取了一下图片的宽度,大概的计算了一下左右拖动的边界。
查询里用的组件是`ComputedNode` , 这个组件提供了布局完成后,实际获得Node的值
``` rust
fn drag_images_collection(
trigger: Trigger<Pointer<Drag>>,
container: Single<(&mut Node, &ComputedNode, &Children), With<ImagesContainer>>,
compute_node: Query<&ComputedNode>,
) {
let (mut container, current_node, children) = container.into_inner();
let Val::Px(px) = container.left else {
return;
};
let child_node = compute_node.get(*children.first().unwrap()).unwrap();
let child_width = child_node.size().x;
let min_x = -(current_node.size().x + child_width);
let max_x = current_node.size().x - child_width;
let new_left = px + trigger.event.delta.x;
if new_left < min_x {
container.left = Val::Px(min_x);
return;
}
if new_left > max_x {
container.left = Val::Px(max_x);
return;
}
container.left = Val::Px(new_left);
}
```
## 最后成品